I remember before I started making themes for Phoenix, I don't know anything at all about icons design and theme design. At that time, I have never even created a theme or skin for any software before. But somehow I was motivated to create one for Phoenix, just for fun anyway.
I decided to give it a try and used the Qute theme as my base, because it was the most polished theme at that time. After decompressing the theme package, I look around and surprised to see that all are plain CSS files and mostly PNG images. When reading the files, I began to understand that all the UI elements in Phoenix are rendered with CSS properties! Using my basic CSS knowledge, it got me started right away.
As you might not know, my first theme is not Phoenity. It's called Phoenie. It's my first ever attempt to create toolbar icons. Obviously, the icons look a lot like Phoenity, as they are now better known as the pre-Phoenity icons. When I released this theme, I didn't get much response from the community because the theme was very buggy. As I remember, the only person giving feedback was Chris Neale, who helped me a lot since then.
Unfortunately, the Phoenie icons are a bit too complex, so I decided to make a much simpler version which is now known as Phoenity. The simplicity of the icons actually gives me more time to focus on the codes and learn some stuff. One of the problems I had is that I don't understand some of the Mozilla-proprietary CSS codes. I was confused how -moz-image-region works as it is one of the most common properties used around the theme files. I guess, this could the first problem faced by most novice theme designers in the Mozilla community.
According to XULPlanet.com, the syntax is explained as such:
For elements that have an image, this property sets the area of the image that is used. You can set multiple elements to use the same image but use a different region of the image, reducing the amount of memory required. You can change this property to simulate animation. The syntax is similar to the
clipproperty. All four values are relative to the upper left corner of the image.-moz-image-region: rect(top, right, bottom, left);— http://xulplanet.com/references/elemref/ref_StyleProperties.html#prop_-moz-image-region
Okay, that looks pretty easy. But wait the minute. Eventhough it is similar to the clip property, I have not learn this CSS 2.1 property myself. As none of all the web sites I've visited so far use this specific property, no wonder I don't know anything about it. I have to read through the CSS specification. Again, I had another problem, I couldn't remember which is the top, right, bottom and left, for example:
-moz-image-region: rect(10px, 30px, 30px, 10px);Sometimes, I accidentally got it reversed and messed things up. Well, I managed to find a way to remember, from the stylesheets of Tantek's web site, which is to think of a clock. It's no different than other shorthand properties such as border-width, padding and margin. Following the clockwise path, the code above would mean 10 pixels for top, 30 pixels for right, 30 pixels for bottom and 10 pixels for left. Whoa, so easy!
Now let's take a look at the difficult part. -moz-image-region practically works almost like image cropping, where you can crop certain areas of the image so that it shows only the area you want. The difference is -moz-image-region doesn't really crop it out but rather hide the areas around it. Why? Because these hidden areas can be reused again for other purposes, which means different elements may use one big image but each uses different regions of it, thus reducing the amount of memory required, as stated above.
I know, explaining in words is not enough, so below are few steps for further understanding.
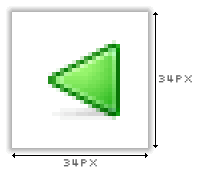
First, we get an image, as shown. It's the Winstripe 0.1 Back icon, which I dig out from my hard drive. Somehow it looks like a good example to be used here. By the scale of 1 pixel equivalent to 4 pixels, the image is 34×34px in dimension. As you can see, I've purposely added some redundant space around the icon, so that you can observe clearly how the clipping works around the icon.
The code used is:
#button{
/*displays the image for any elements with the #button id*/
list-style-image: url(/path/to/image.png);
}
Since no regions are specified, the whole 34×34px image will be displayed.
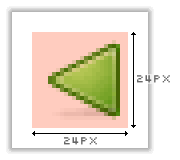
Now, I have to highlight the region to be displayed. This region may be specified in any dimension, as any space outside the region will not be displayed. For this example, I decided to set the region as 24×24px in dimension, because it's the standard size for Winstripe and Luna large icons. Please note that this step doesn't involve any codes and the highlight on the image is only for illustrative purposes. However, this step is rather important especially to pinpoint the dimensions of the region when dealing with an image of multiple icons.

When specifying the offset values of the region from the edges, only the top and left edges are concerned. Offsets of all sides of the region are calculated only from both edges, not right and bottom. I supposed, one might ask, why not all edges since they would be more logical? Well, I don't know. I asked myself that question before. According to the CSS 2.1 specification, for the
clipproperty, quoted:Future versions may also reintroduce a syntax for offsetting shapes from each edge instead of offsetting from a point.
So, let's just get on with it. No codes are needed in this step too.
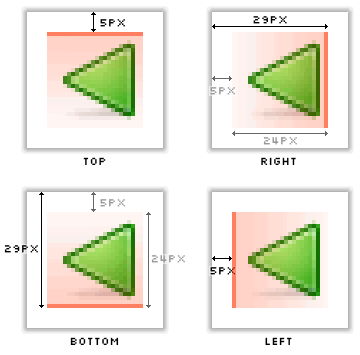
It's time to do some simple mathematics, to find out the pixels for each offset of the region. From the diagram shown, the top and left offsets are 5 pixels. The right and bottom offsets are 29 pixels, as calculated from the top and left edges of the image (24 + 5 = 29).
So, the code now is:
#button{
list-style-image: url(/path/to/image.png);
-moz-image-region: rect(5px, 29px, 29px, 5px);
}
Only this region will be displayed for the
#buttonelement. Anything outside will be hidden from view. Yeah.
From the steps above, it explains much why you will see images with multiple icons when opening the theme JAR files. You might see a PNG image showing all toolbar icons, including its hovered states, disabled states and in some themes, even active states. When the UI element displays a region of this image, it basically will load this whole file into memory. It's a bit like creating graphical menu effects on web pages when you need to pre-load some images into the browser cache so that the menu images can switch flawlessly without flicker. In this case, the idea is applied in exactly the same way to pre-load images into your system memory, instead.
This implementation can be used to simulate animation, for example showing region A by default, region B when the element is hovered and region C when in disabled state.
The codes, for example, would look like this:
/*default state*/
#button{
list-style-image: url(/path/to/image.png);
-moz-image-region: rect(0px, 24px, 24px, 0px);
}

/*hovered state*/
#button:hover{
-moz-image-region: rect(24px, 24px, 48px, 0px);
}

/*disabled state*/
#button[disabled="true"]{
-moz-image-region: rect(48px, 24px, 72px, 0px);
}
Once you master this, you can start creating themes for Firefox right away. Of course, this is only the beginning and along the process, there will be more things to be learned. Believe me, I am also still learning and keep on improving my Phoenity theme. In the MozillaZine Themes forum, I've read quite a lot of people have asked for a theme tutorial, so I think my post here could help a little.
Designing themes for Firefox requires time, patience, curiosity and willingness to learn. Novice theme authors should also have the courage to ask questions. There are many experienced theme authors I know who can help. At least one of them will lend a hand. If not, just sue me.
Note: The icons used in this post are known as Winstripe 0.1, first included in Mozilla Firefox 0.9 and have since improved till what we see today in Mozilla Firefox 1.0. These images are created by Kevin Gerich and Stephen Horlander.